Multiple Outputs
Normally all 16 pads come out of Sitala’s main stereo output, so your DAW sees one drum mix. With multiple outputs (“multi-out”), each pad gets its own output, and so its own channel in your DAW’s mixer. That’s how you put a compressor on just the kick, send only the snare to a reverb, or record each drum to its own track.
How it works
Sitala has 16 stereo outputs, named Output #1 to Output #16. Pad 1 plays through Output #1 (the main output), pad 2 through Output #2, and so on.
Two things need to happen:
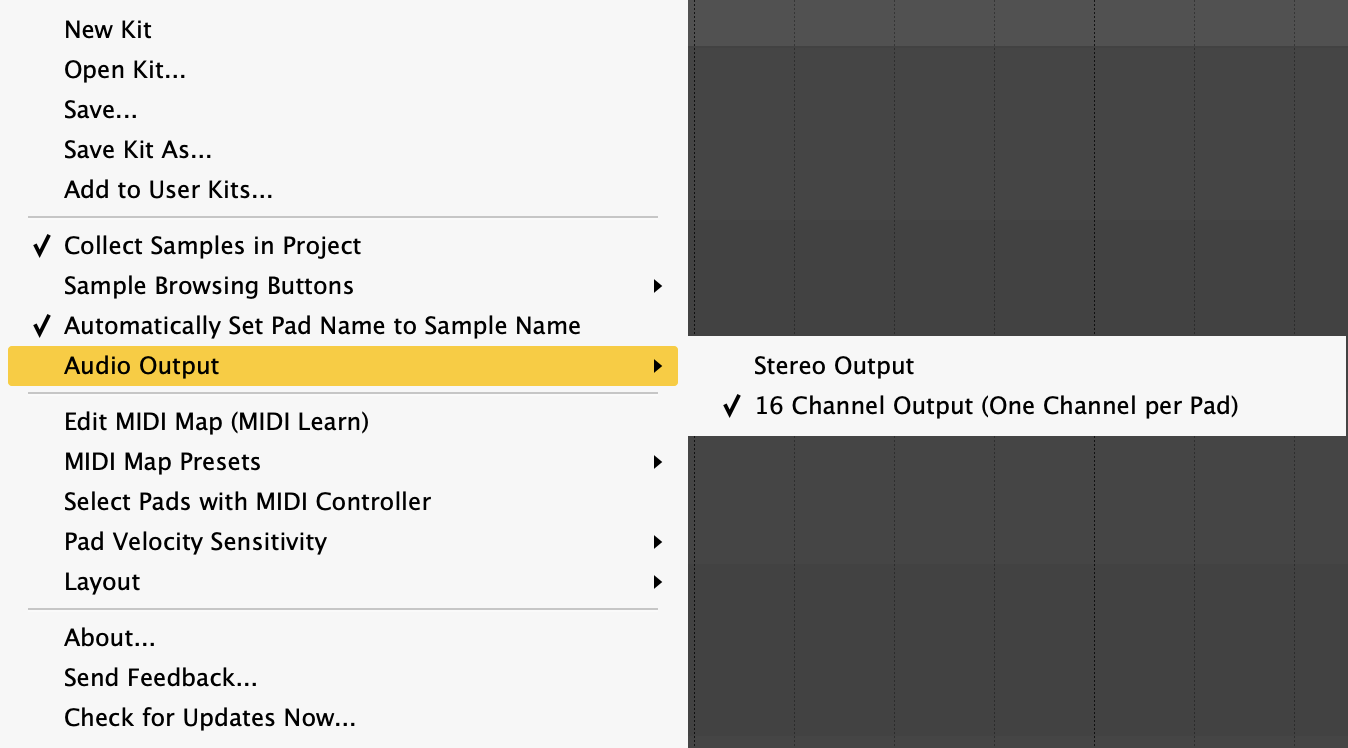
- Sitala needs to be in multi-out mode. In the options menu, choose Audio Output → 16 Channel Output (One Channel per Pad). In Stereo Output mode, every pad plays through the main output, no matter what your DAW has set up.
- Your DAW needs to make the extra outputs available and give them mixer channels. How you do that depends on the DAW — see below.
Give every pad you use its own channel. Most DAWs (REAPER, Ableton Live and Pro Tools, for example) make all of Sitala’s outputs available up front, so a pad whose output isn’t picked up by any channel is silent.
The main channel is pad 1. Because pad 1 uses the main output, the channel Sitala is inserted on carries pad 1. In DAWs that number auxiliary outputs separately, like Logic, Aux 1 is pad 2.
Moving pads changes which output they use: if you drag the snare from pad 2 to pad 5, it comes out of Output #5. Sitala highlights affected pads when you move them.
In REAPER, Sitala does all of this for you. In other DAWs, it takes a minute of setup.
DAWs
REAPER
REAPER is the one DAW where Sitala sets up multi-out automatically, creating and naming a track for every pad. This uses REAPER’s own plugin API, so it works with the VST3 and VST versions of Sitala, not the AU.
Setting it up
-
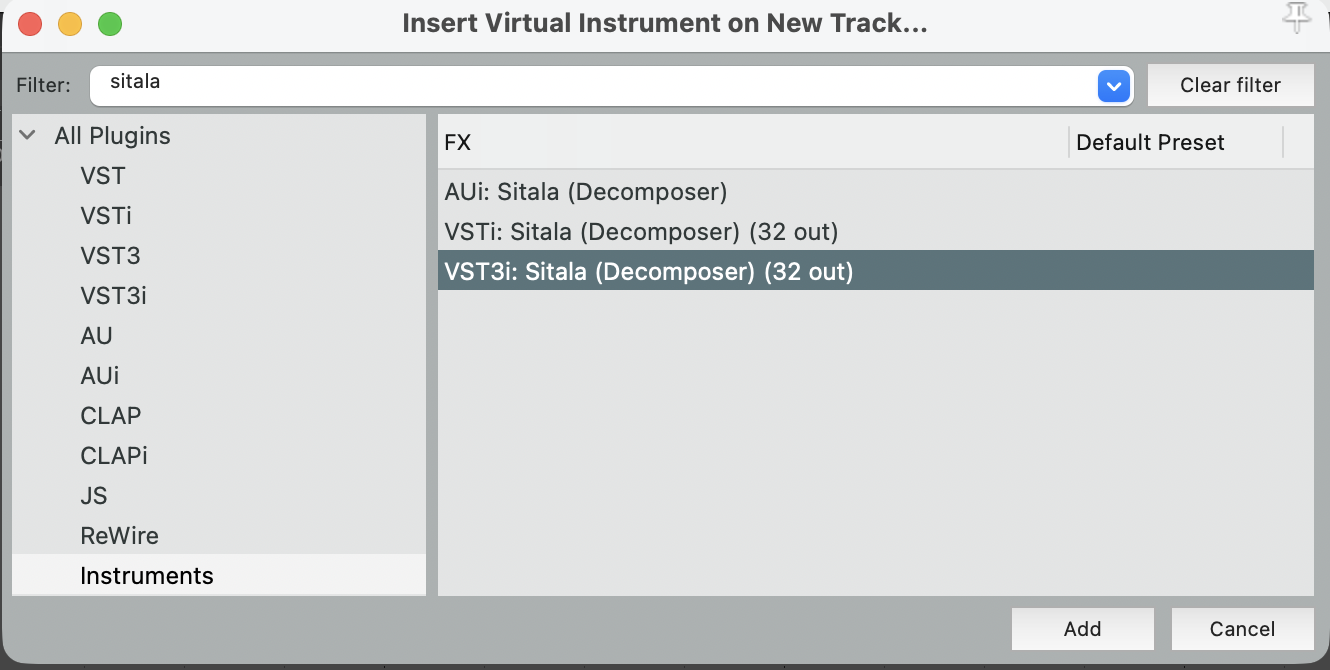
Choose Track → Insert virtual instrument on new track… and pick VST3i: Sitala (Decomposer) (32 out).
-
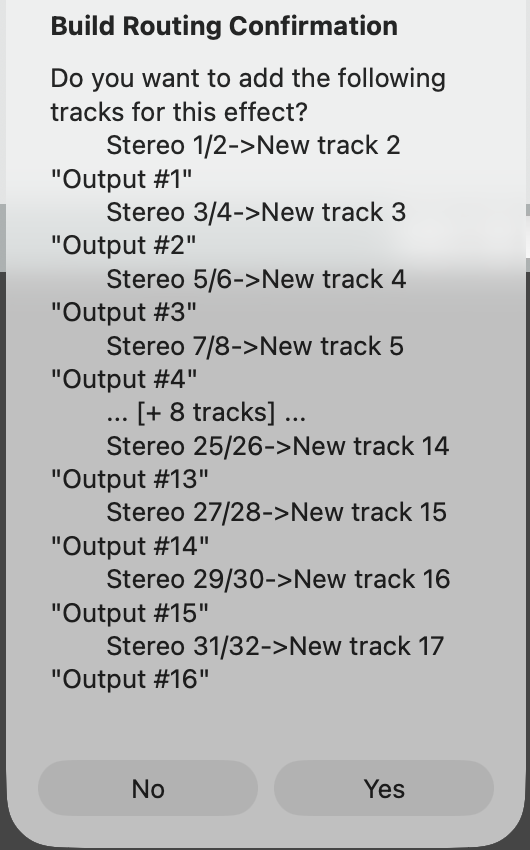
REAPER asks whether to build routing for Sitala’s outputs. Choose Yes.
-
REAPER then asks whether to route MIDI from the new tracks to Sitala. Choose No — you’ll play Sitala from its own track.
That’s it. Sitala switches itself to 16 Channel Output, and names each new track after its pad:
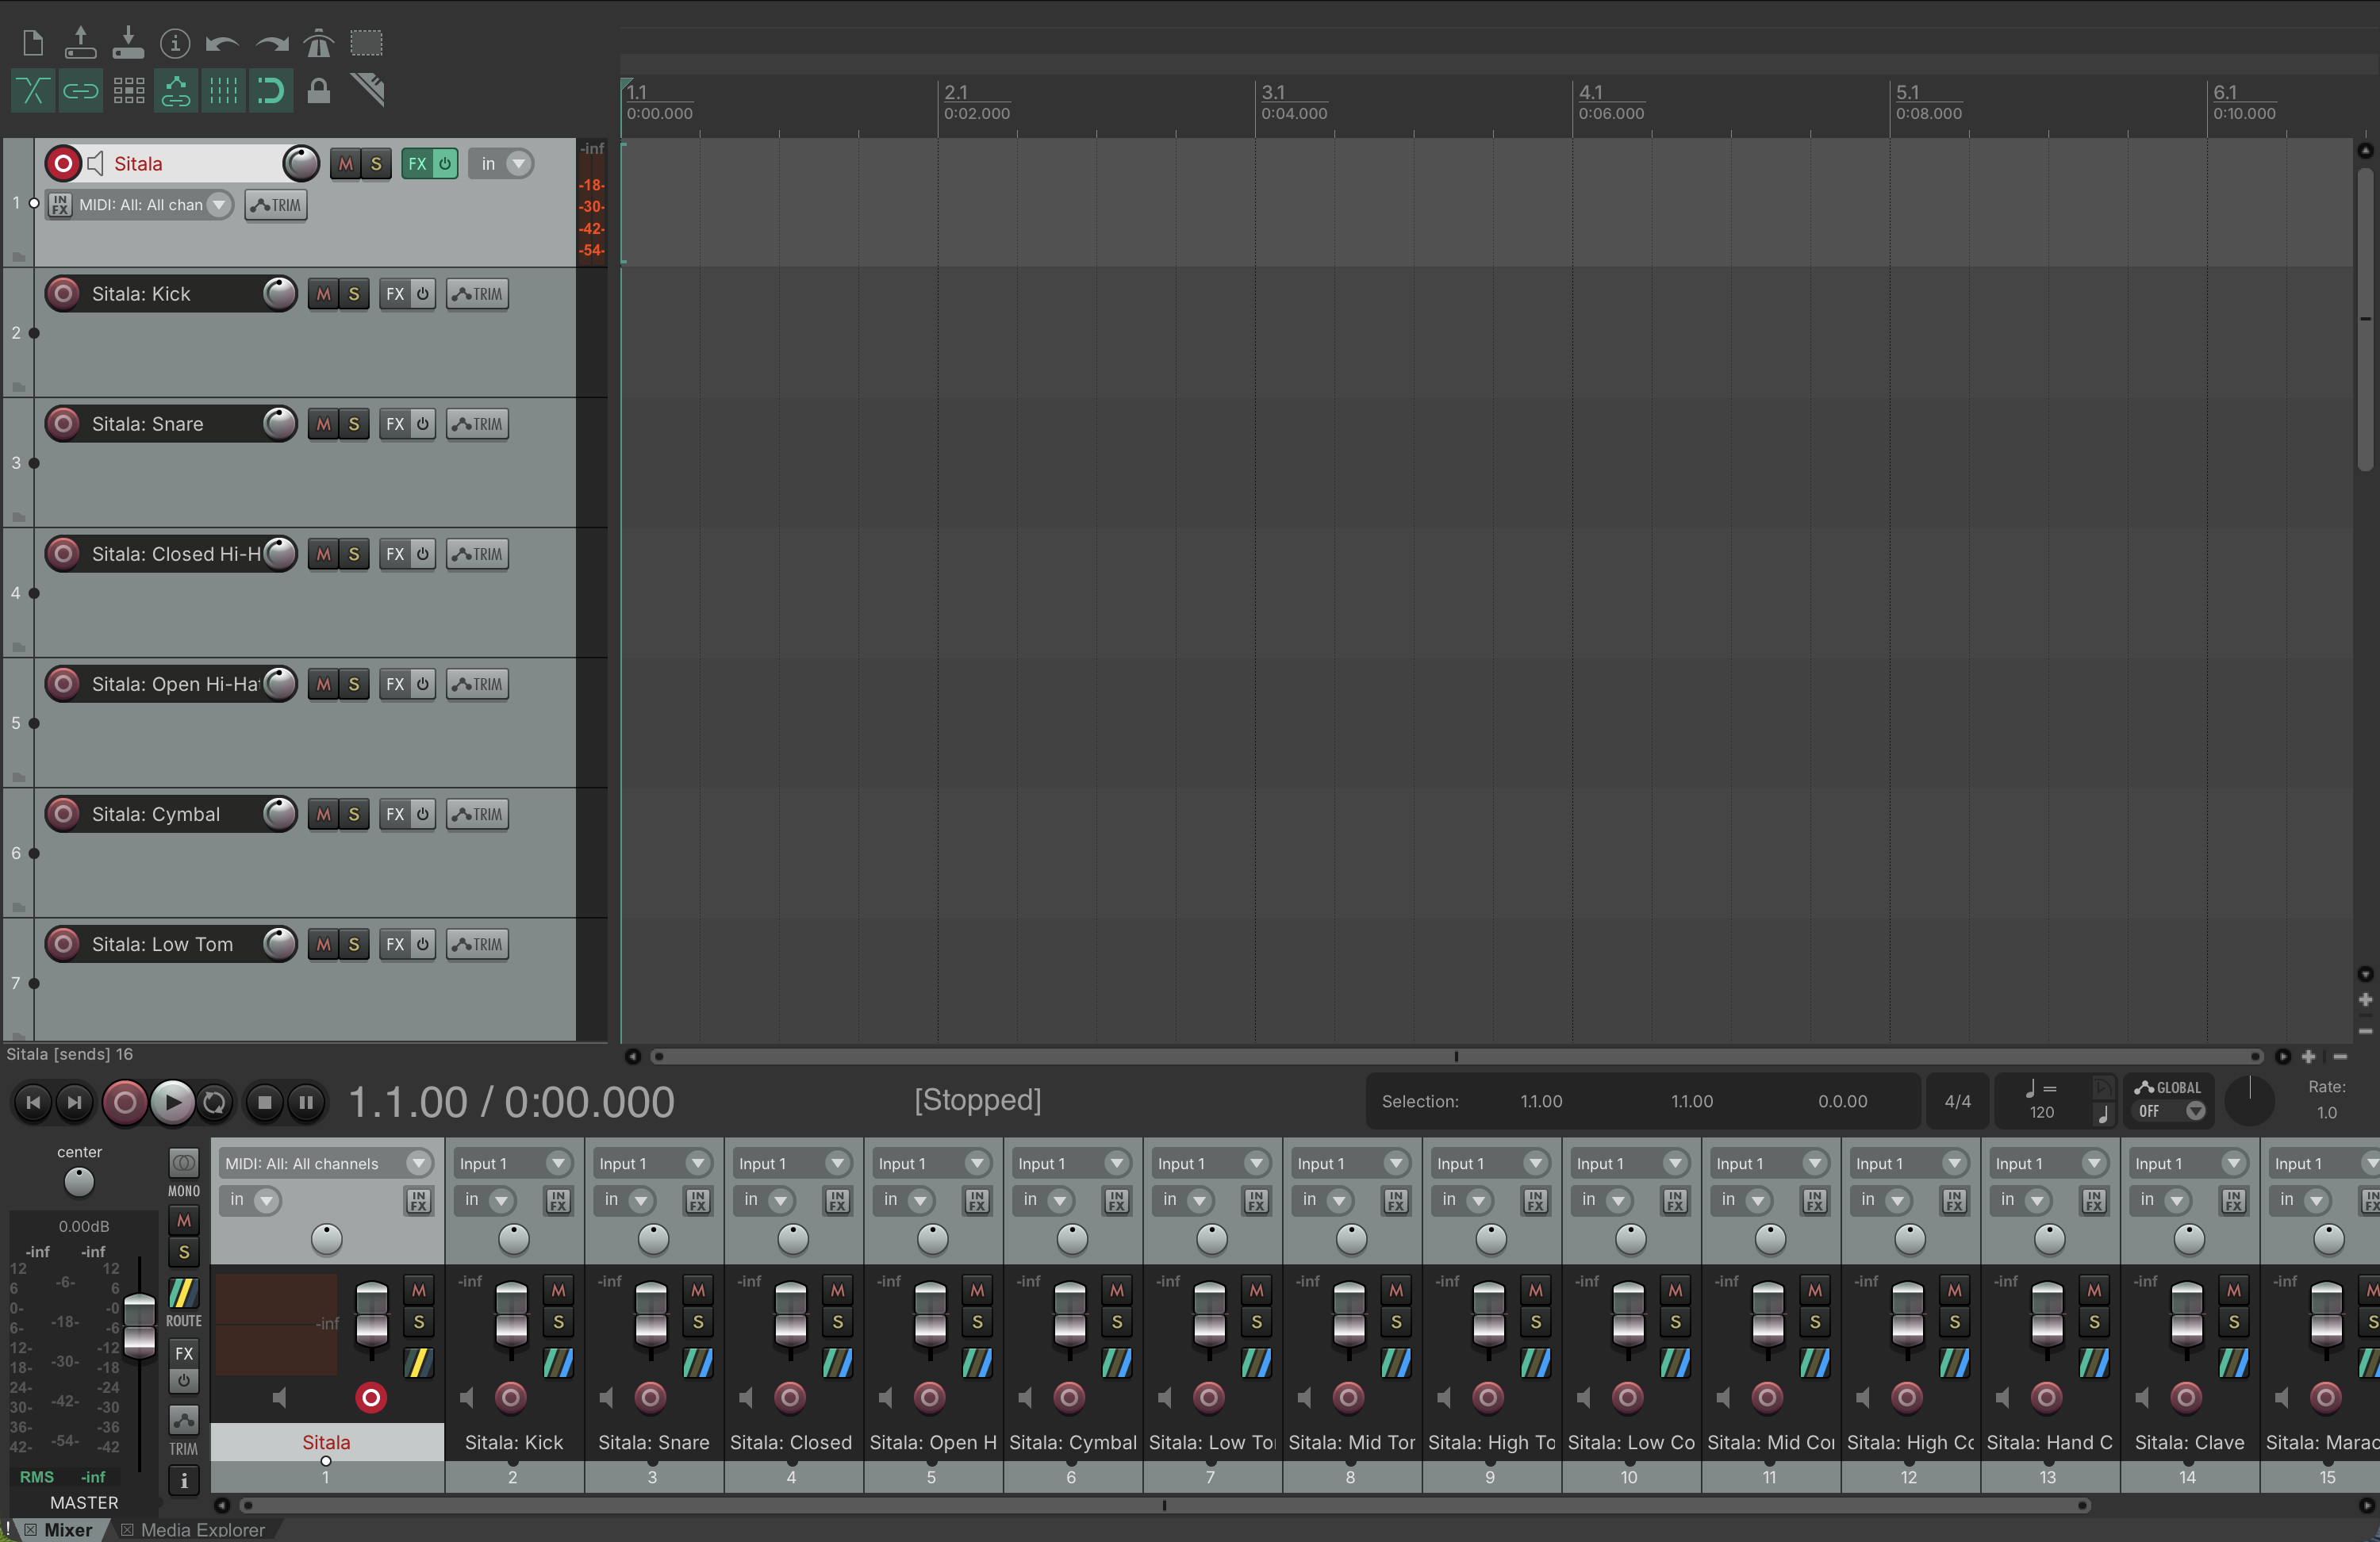
If you add Sitala to an existing track instead, just choose Audio Output → 16 Channel Output (One Channel per Pad) in Sitala’s options menu, and it creates the tracks.
What Sitala keeps in sync
- Track names follow pad names (Sitala: Kick, Sitala: Snare…). Empty pads are named Sitala: (unused). Renaming a pad renames its track.
- Moving pads in Sitala reorders their tracks.
- Switching back to Stereo Output removes the pad tracks.
Put MIDI items on the Sitala track (the parent). The pad tracks only receive audio.
Things to know
- The Sitala track’s own fader and pan don’t affect the pads. Once multi-out is on, the Sitala track no longer sends audio to the master; each pad track does, including pad 1’s. Mix on the pad tracks.
- Effects on one drum: add them to that pad’s track. To send a drum to a reverb, create a send from its pad track (not from the Sitala track, which would send every pad).
- Sitala leaves your changes alone. If you re-route a pad track (for instance, to group several pads into one bus), or put media items or an instrument on it, Sitala stops managing it.
- If you’d rather not have separate tracks, choose Audio Output → Stereo Output in Sitala’s options menu.
Logic Pro
Logic uses the AU version of Sitala. It has a separate multi-output version of the plugin for this.
Setting it up
-
Create a software instrument track (Track → New Tracks…, then Software Instrument). Under Instrument, choose AU Instruments → Decomposer → Sitala → Multi-Output (16xStereo).
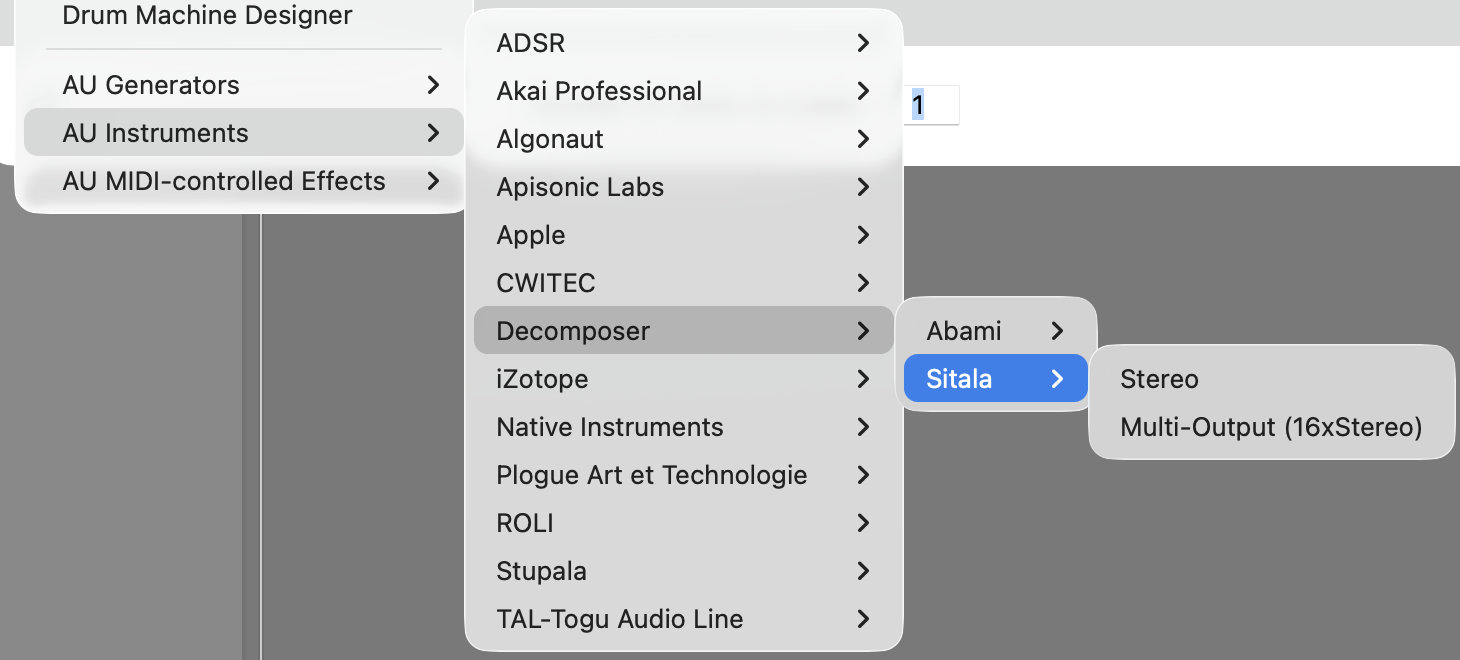
If Sitala is already on a track as Stereo, click the instrument slot on the channel strip and choose the Multi-Output (16xStereo) version instead. Save your kit first, in case Logic doesn’t carry over the plugin’s settings.
-
In Sitala’s options menu, choose Audio Output → 16 Channel Output (One Channel per Pad).
-
Open the mixer (View → Show Mixer, or press X). The Sitala channel strip has small + and – buttons at the bottom. Click + once for each pad you want on its own channel. Each click adds an Aux channel fed by the next pair of Sitala’s outputs.
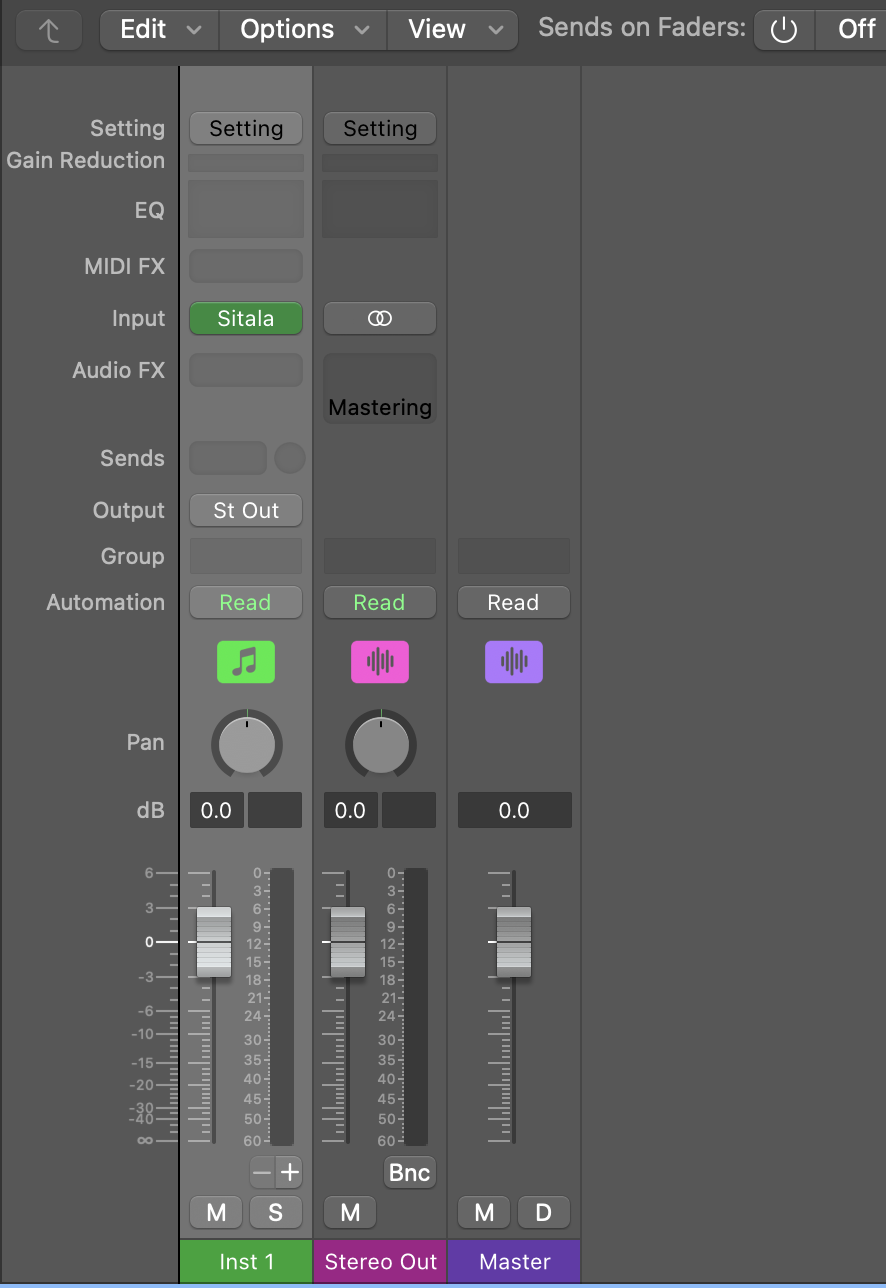
-
Play a pad and watch the meters:
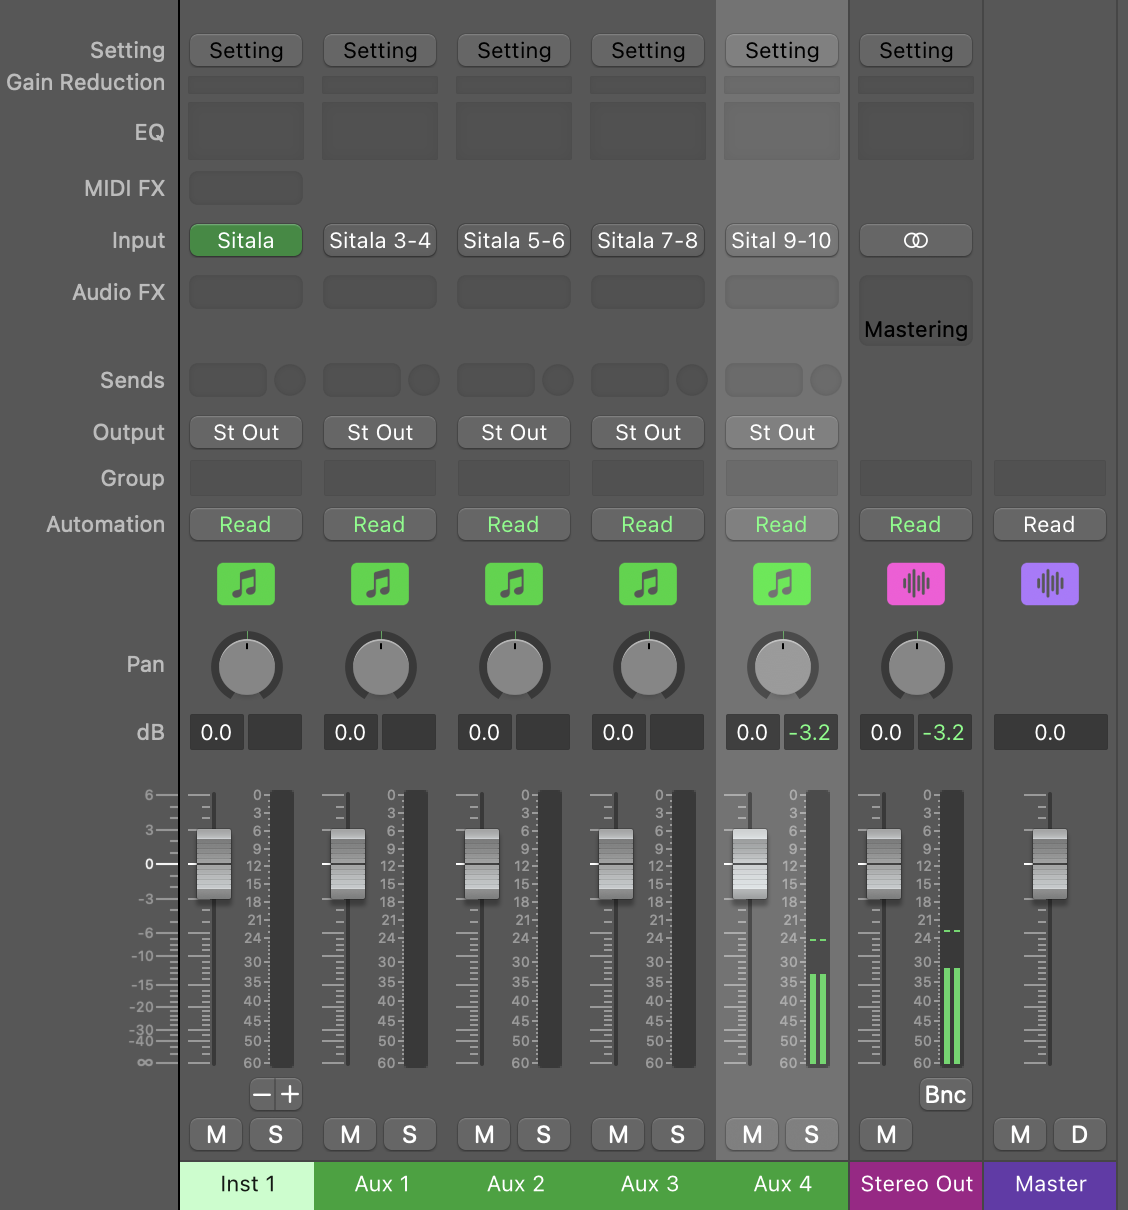
Here the cymbal, pad 5, is playing on Aux 4.
Which pad is on which channel?
| Channel | Input | Pad |
|---|---|---|
| Sitala’s instrument channel | Sitala | 1 |
| Aux 1 | Sitala 3-4 | 2 |
| Aux 2 | Sitala 5-6 | 3 |
| Aux 3 | Sitala 7-8 | 4 |
| … | … | … |
| Aux 15 | Sitala 31-32 | 16 |
The aux numbers are always one less than the pad number, because pad 1 plays on the instrument channel itself. Add an aux for every pad you use.
Double-click an aux channel’s name at the bottom of the mixer to rename it, for example to Kick or Snare.
Things to know
- Record MIDI on the Sitala instrument track. The aux channels only carry audio.
- Effects on one drum: add them to that pad’s aux channel. Sends from an aux channel only send that pad.
- Mixing: the instrument channel’s fader only affects pad 1. The auxes are independent channels.
Ableton Live
In Live, each pad gets an audio track that takes its input from one of Sitala’s outputs. These steps use Live 11 and the VST3 version of Sitala.
Setting it up
-
From the browser, choose Plug-Ins → VST3 → Decomposer → Sitala and drag it onto a MIDI track (or double-click it to load it on the selected track).
-
In Sitala’s options menu, choose Audio Output → 16 Channel Output (One Channel per Pad).
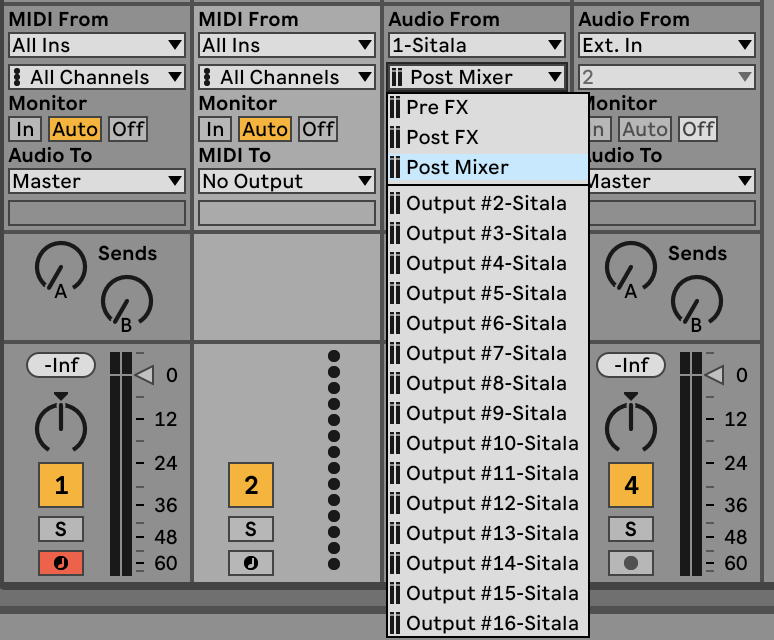
- Create an audio track for a pad (Create → Insert Audio Track). In the
track’s Audio From section (in Session View; in Arrangement View, show it
with View → In/Out):
- In the top menu, choose the Sitala track, e.g. 1-Sitala.
- In the menu below it, choose the pad’s output, e.g. Output #2-Sitala for pad 2.
-
Set the audio track’s Monitor to In, so you hear it without having to arm it.
- Repeat for each pad you want on its own track, and rename the tracks (⌘R) after the pads.
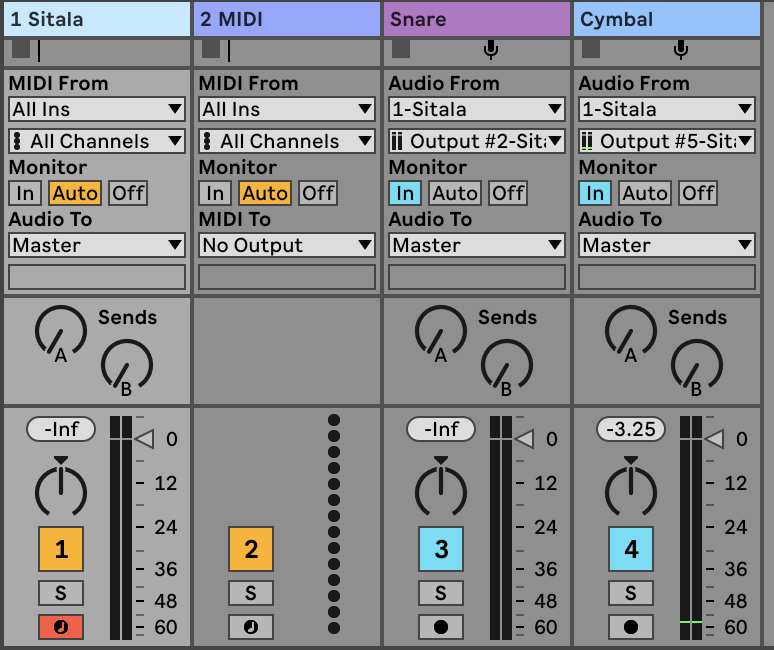
Here the snare (pad 2) comes in on the Snare track through Output #2, and the cymbal (pad 5) on the Cymbal track through Output #5, which is playing.
Things to know
- Pad 1 plays on the Sitala track itself. The Post Mixer entry in the Audio From menu is that main output.
- Every other pad needs its own audio track to be heard. Live makes all of Sitala’s outputs available, so a pad whose output isn’t picked up by any track is silent. If a pad goes quiet after switching to 16 Channel Output, it doesn’t have a track yet.
- Record your MIDI on the Sitala track. The audio tracks only carry sound.
- Effects on one drum: add them to that pad’s audio track.
- Recording each drum as audio: arm the pad tracks and record.
Pro Tools
In Pro Tools, each pad gets a stereo Aux Input track fed by one of Sitala’s plugin outputs. There’s only one Sitala plugin — the extra outputs appear once it’s on a track.
Setting it up
-
Create a Stereo Instrument Track (Track → New…).
-
Click an insert slot on the track and choose multichannel plugin → Instrument → Sitala (stereo).
-
In Sitala’s options menu, choose Audio Output → 16 Channel Output (One Channel per Pad).
-
Create stereo Aux Input tracks, one for each pad you want on its own channel (Track → New…, e.g. 2 new Stereo Aux Input).
-
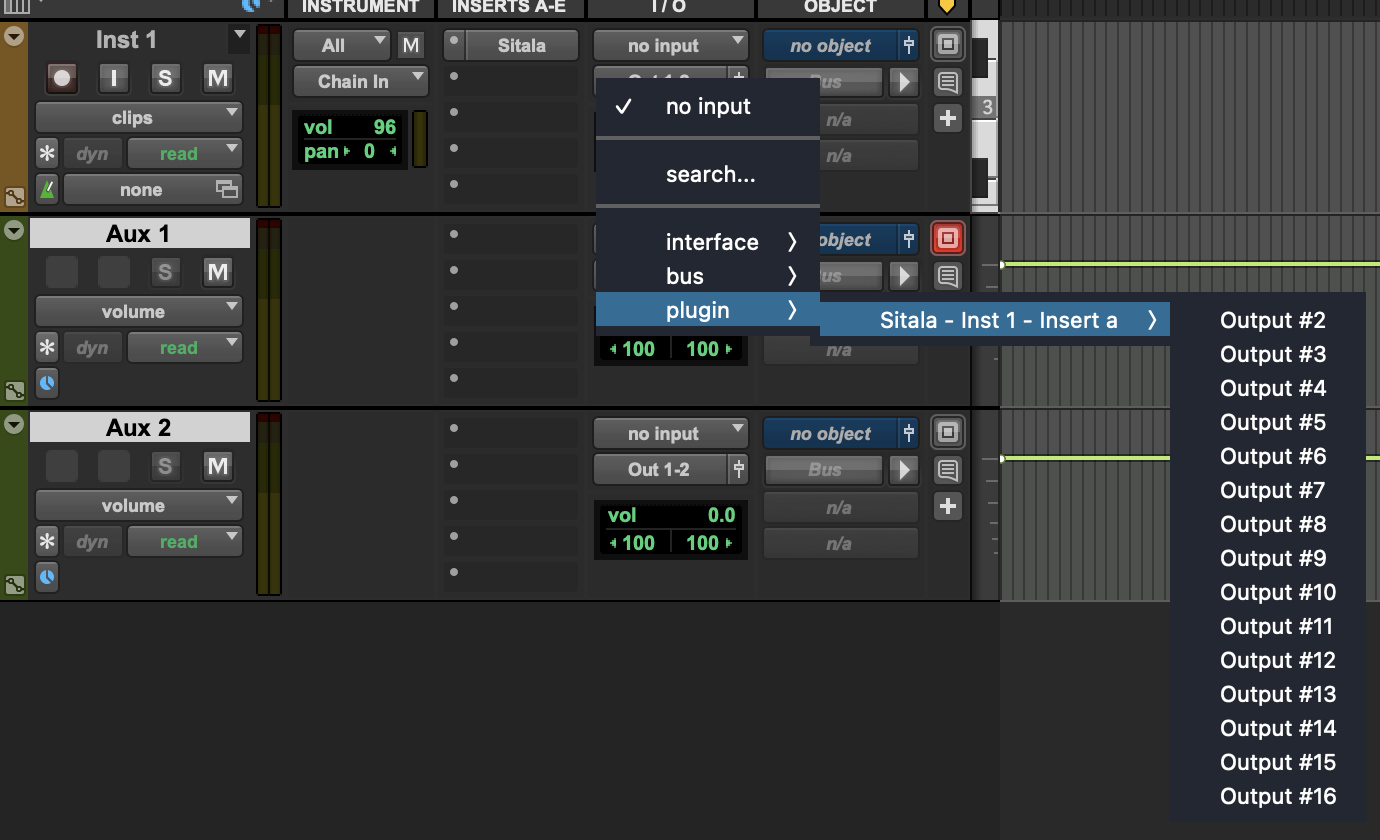
On each aux track, click its input selector (in the I/O column) and choose plugin → Sitala - Inst 1 - Insert a → Output #N, where N is the pad number.
-
Rename the aux tracks after the pads (double-click the track name).
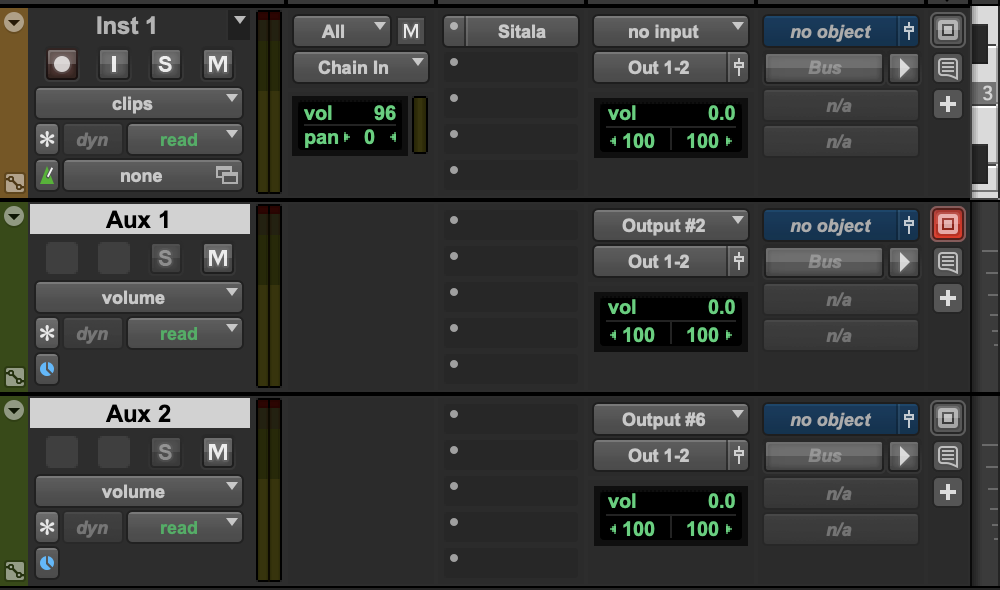
Here Aux 1 takes the snare (Output #2) and Aux 2 the low tom (Output #6).
Things to know
- Pad 1 plays on the instrument track itself.
- Every other pad needs its own aux track to be heard. Pro Tools makes all of Sitala’s outputs available, so a pad whose output isn’t used by an aux track is silent.
- Record MIDI on the instrument track. The aux tracks only carry audio.
- Effects on one drum: insert them on that pad’s aux track.
Bitwig Studio
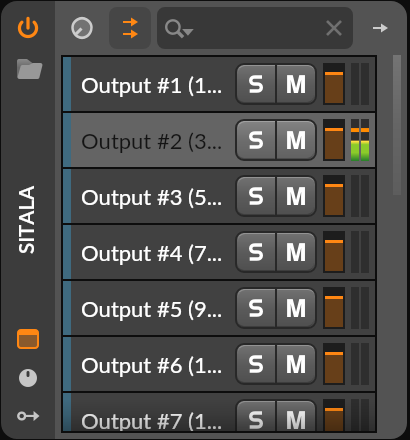
In Bitwig, Sitala’s outputs become chains inside the Sitala device, one per pad, each with its own meter, mute, solo and effects.
Setting it up
- Select an instrument track, click + in the device panel, search for Sitala and pick the VST3 version (the info panel on the right shows the format). A new instrument track is already record-armed, so your controller plays it.
- In Sitala’s options menu, choose Audio Output → 16 Channel Output (One Channel per Pad).
-
In the Sitala device’s header, click the Show plug-in multi-out chain selector button (the two arrows), then Add Missing Chains.
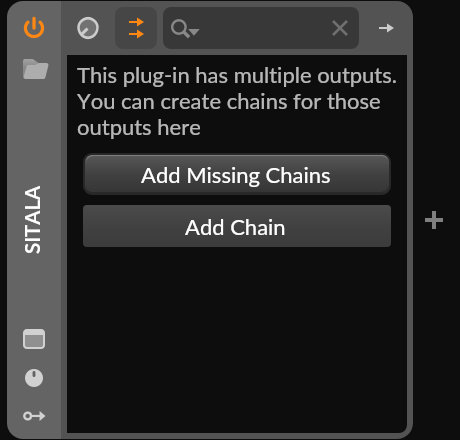
Bitwig adds a chain for every output: Output #1 (pad 1), Output #2 (pad 2) and so on. Play a pad and its chain’s meter moves:
Mixing
- Effects on one drum: select that pad’s chain and click the + to the right of the chain list. The effect only affects that chain.
- Each chain has its own S (solo) and M (mute) buttons.
- To show Sitala’s window again, click the Show plug-in window button on the left edge of the device.
FL Studio
FL Studio sends each of Sitala’s outputs to a mixer insert. You set this up in FL’s plugin wrapper.
Setting it up
-
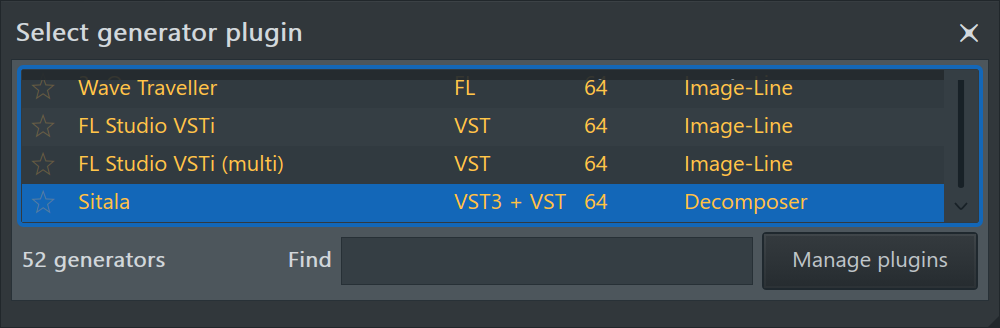
Click + at the bottom of the Channel rack, choose More plugins… and double-click Sitala (vendor Decomposer).
- In Sitala’s options menu, choose Audio Output → 16 Channel Output (One Channel per Pad).
- Click the gear icon in the top left corner of the plugin window, then the tab with the plug and cog icon, then Processing.
-
Under Connections, click Auto map outputs.
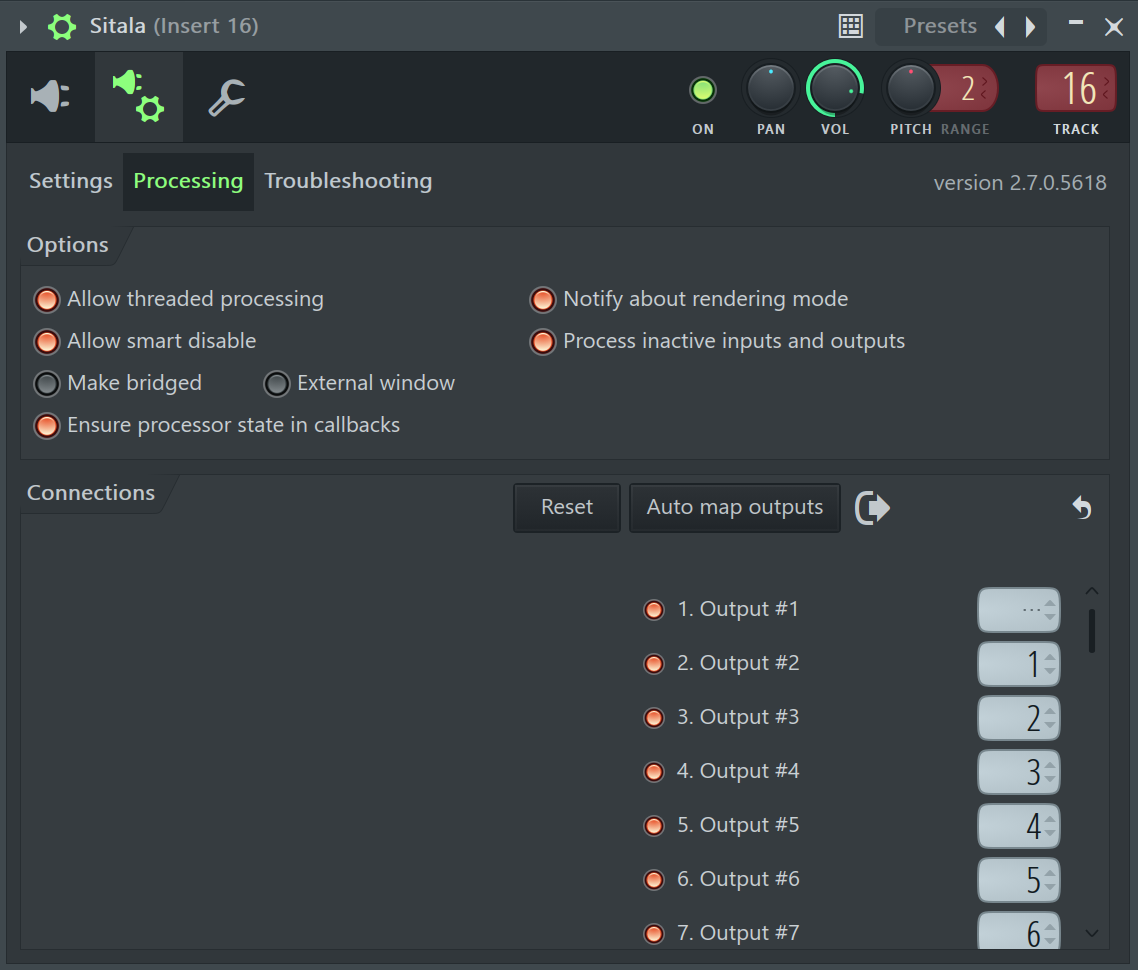
The box next to each output shows the mixer insert it goes to. Auto map outputs sends Output #2 to Insert 1, Output #3 to Insert 2, and so on, so pad N plays on Insert N−1.
Pad 1 is different: Output #1 goes wherever the Sitala channel itself goes, which is the TRACK box in the top right (— means the Master). Hover over TRACK and scroll to pick a free insert, like 16, so pad 1 gets its own insert too.
To send any output somewhere else, hover over its box and scroll.
Mixing and stems
- Names: right-click an insert in the mixer and choose Rename, color and icon… (F2).
- Effects on one drum: add them to that pad’s insert.
- Stems: choose File → Export → Wave file…, then turn on Split mixer tracks before you click Start.
Cakewalk
These steps were tested in Cakewalk Sonar.
Setting it up
-
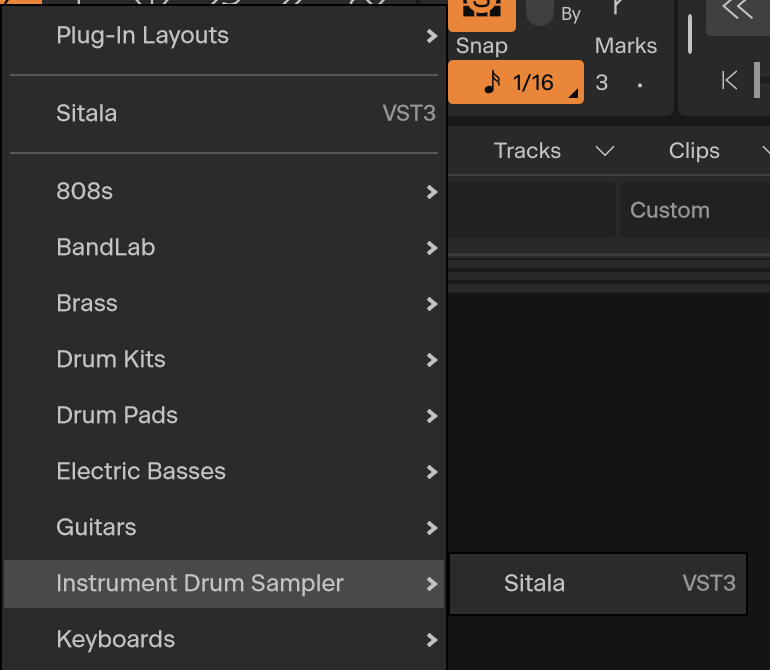
Choose Insert → Soft Synth and pick Sitala. It’s listed under Instrument Drum Sampler.
-
In Insert Soft Synth Options, turn off Simple Instrument Track, and turn on MIDI Source and All Synth Audio Outputs: Stereo. Click OK.
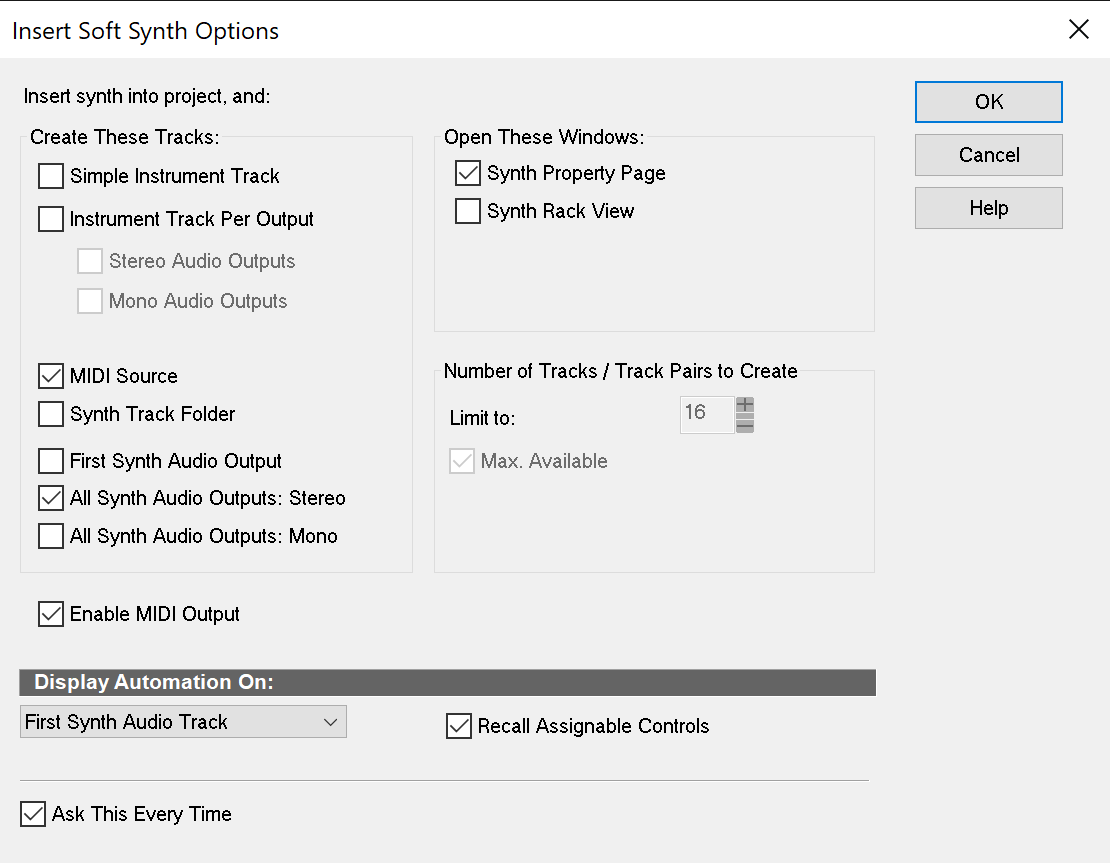
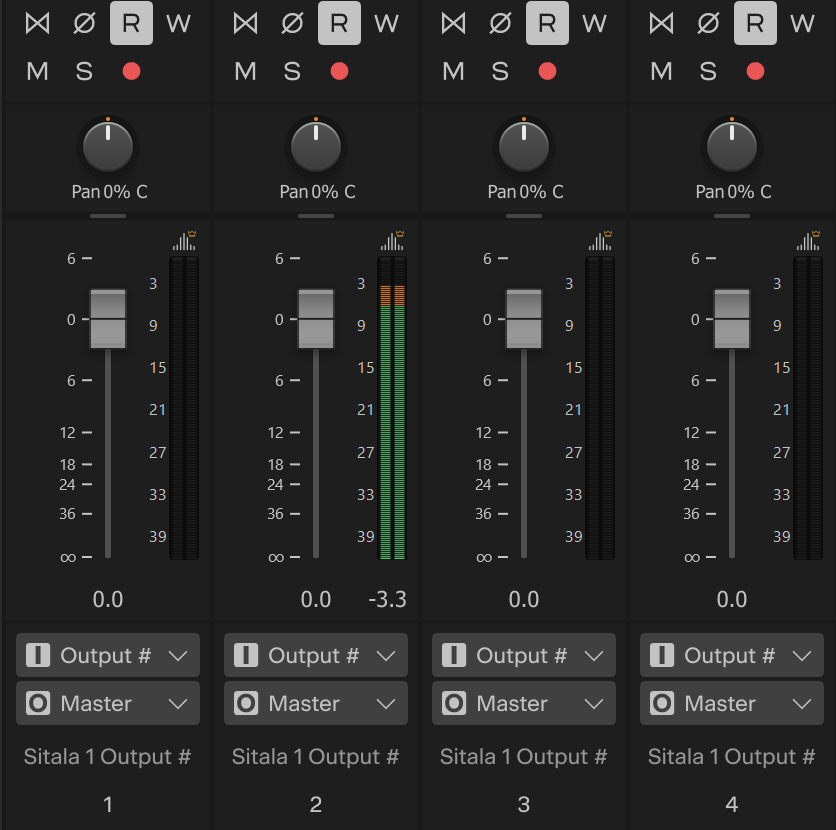
Cakewalk creates a MIDI track called Sitala 1, plus an audio track for each output: Sitala 1 Output #1, Sitala 1 Output #2, and so on.
-
In Sitala’s options menu, choose Audio Output → 16 Channel Output (One Channel per Pad).
Play from the Sitala 1 MIDI track. Its input is Omni (all MIDI inputs) and input echo is on, so your controller plays Sitala straight away.
Open the Console view: pad N plays on Sitala 1 Output #N. Here’s pad 2:
Mixing and stems
- Names: double-click a track’s name to rename it.
- Effects on one drum: add them to the FX Rack of that pad’s track.
- Stems: choose File → Export → Audio… and set Source Category to Tracks.
← MIDI · Contents · Next: REAPER Projects →
Contact